Hello again!
It has be been a while since my last post. It is because I was quite busy leading a team in a program for delivering veracity.com, the open industry data platform from DNV GL. It is a pretty exciting project - to build an open, independent data platform with bleeding edge technologies, to serve a large user base (100 000 registered users). You can read more about veracity at here and here.
It actually is a long and interesting story behind veracity (and its predecessor), together with all challenges that we encountered in this journey. Hopefully I can share them with you in the future.
Anyway, today I would like to talk about in the real world, how Infrastructure-as-Code looks like, together with Azure and VSTS.
Challenges
There are tons of azure templates which is a great start point to use Infrastructure-as-Code in Azure. However, in the real world project, we always need to do a lot of extra work due to:
1. We need multiple environments such as Nightlybuild, Testing and Production environment.
2. Different environments are 90% identical, but we have to handle the 10% differences
For example, we use more powerful App Service Plan in Production, but cheaper plan for Nightly build, in order to save the cost.
3. We cannot include secrets (e.g. database password and keys) in version control.
4. We want to release without downtime.
5. We want to release new version fast, with quality control
6. We do NOT like manual job!
Above introduces the complexity to the CI/CD process, so it is important to have some best practices and common understanding in the team.
Let’s start with something simple
Let’s start with something simple, then we evolve it overtime for addressing different challenges.
Lets say we are going to build a simple nodejs web application as following, and host it in Azure. This application is named “MyWords”.
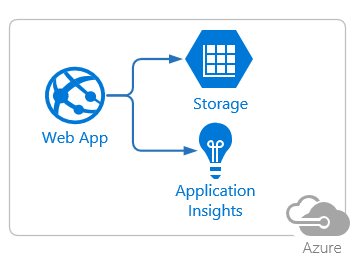
It has 3 components:
- An Azure App Service,
- An Azure Storage Account, and
- An Azure Application Insight
The application setting of the web app contains the storage account connection string and application insight instrumentation key.
One environment, for the PoC##
As a developer, you can simple go to Azure portal and create them manually. It is perfectly OK especially when you are building a PoC.
- Create resource group
- Create a app service
- Create a storage account, copy the connection string into app settings of the web app.
- Create an application-insight, and copy the instrumentation key into app settings of the web app.
Multiple environments, when things are getting real
Now as usual, when the project became serious, we need multiple environments for a better control. In this case, they are Nightlybuild, Testing and Production.
- Nightlybuild: Every night we pull the latest code changes and deploy to this environment. Fully automatic process.
- Testing: We would like to deploy the version that we have verified in NightlyBuild to Testing environment. The deployment process should be automatically but it requires manual approval, by Quality Assurance (QA).
- Production: Fully automatic deployment process, but requires manual approval, by Product Owner (PO).
For now, these 3 environments are identical (of course, they are 3 different web app with different url, 3 storage accounts and 3 application-insight instances).

Now the manual steps from previous stage become tedious and time consuming, we would like to automate them.
It can be simply achieved by using Azure Resource Manager template and VSTS task.
Tips:
- Azure quickstart template is a good place to start.
- The official and latest schema can be found at https://docs.microsoft.com/en-us/azure/templates/, for example the web site schema.
- If you have VS2017, you can use the built-in template Azure Resource Group.
- you can create the resources manually, then export them in json format by going to https://resources.azure.com/
At the end, we have our infra-as-code for our applications.
- A basic skeleton of resource provisioning (see source code), and
- The parameter file for Nightly Build environment (see source code)
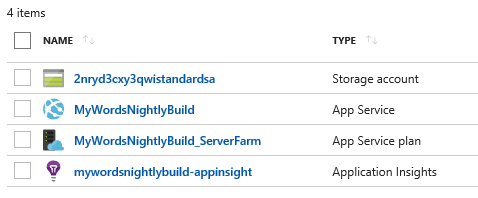
The result of provisioning is
Testing Infra-as-code
It will be several iteration before you get the template right, but if your using VS2017, you can use some GUI for debugging.
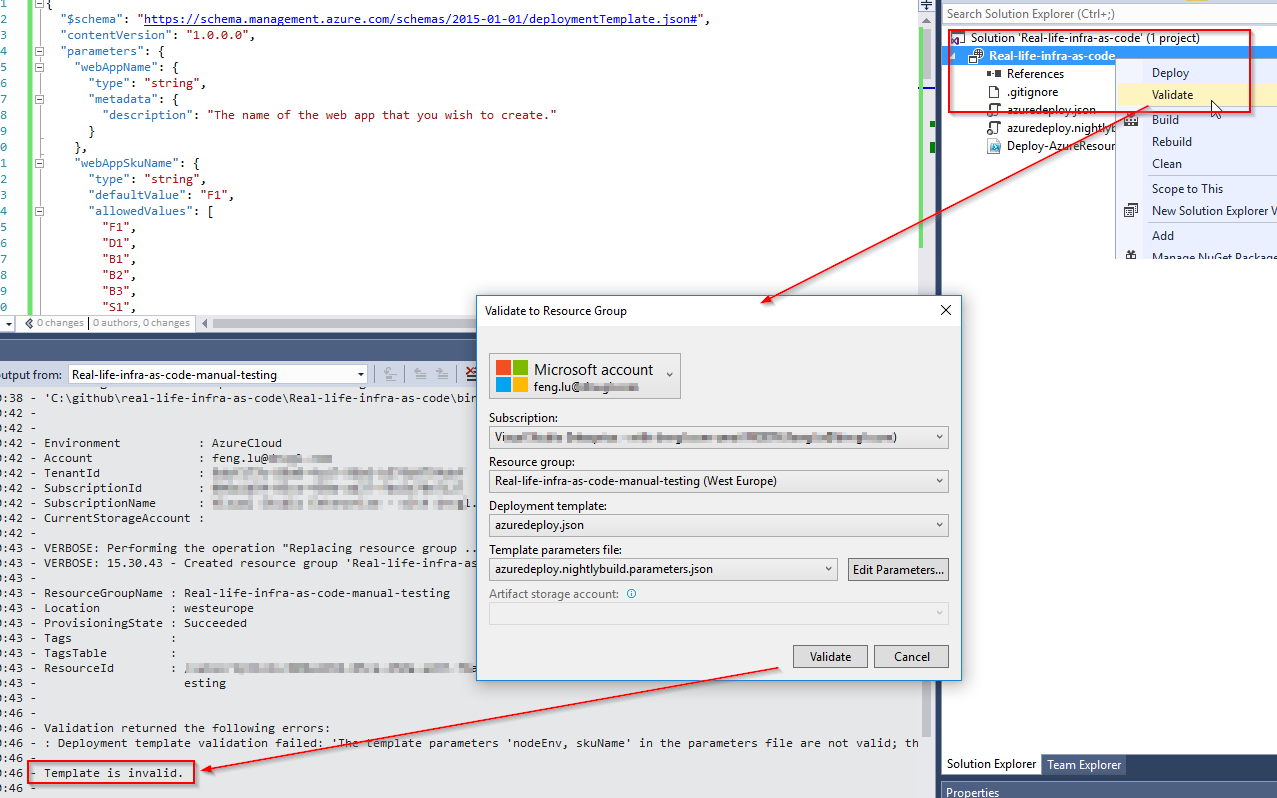
VS2017 is simply calling the following command (Deploy-AzureResourceGroup.ps1 is a standard powershell that VS generated for you, you can also download it here)
1 | Deploy-AzureResourceGroup.ps1 -ResourceGroupName 'Real-life-infra-as-code-manual-testing' -ResourceGroupLocation 'northeurope' -TemplateFile 'azuredeploy.json' -TemplateParametersFile 'azuredeploy.nightlybuild.parameters.json' -ValidateOnly |
Pay attention to the switch parameter: -ValidateOnly. Without it, you can actually provision resources.
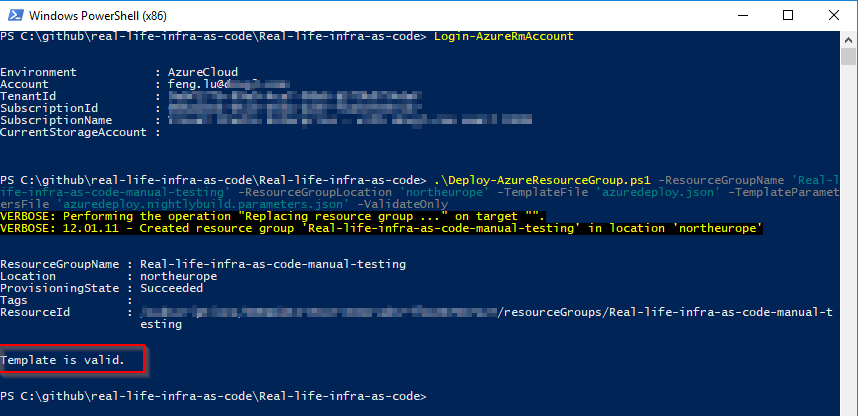
As alternative, you can run
1 | Test-AzureRmResourceGroupDeployment -ResourceGroupName 'Real-life-infra-as-code-manual-testing' -TemplateFile $Env:BUILD_SOURCESDIRECTORY\Real-life-infra-as-code\azuredeploy.json -TemplateParameterFile $Env:BUILD_SOURCESDIRECTORY\Real-life-infra-as-code\azuredeploy.nightlybuild.parameters.json |
Auto passing keys from newly created resources##
It is nice to let the script to create resources for us, but there is only a hard-coded value that we specified in the json file is stored in application settings. Therefore we still have to manually copy keys and connection strings from application-insight and storage account into web site app settings.

1 | { |
To automate this process, we can look into Azure RM template functions. The function listkeys and listvalue is useful for fetching values of a resource.
Now we use this function for passing keys from storage account, and direclty use InstrumentationKey property to get the key from application insight.
1 | { |
In addtion, make sure we add dependencies into website resource, to make sure that we have created the storage account and application insight before the website is created
1 | { |
Double check in application settings:

The updated code can be found at here.
Let’s recap
- Now we have a basic infra-as-code that can provision multiple identical environments.
- It can connect different resources together by automatically passing keys from resource to another.
- We have tools and scripts to verify the infra-as-code
What is next?
In the coming articles, we will continue addressing the following challenges:
- Different environments are 90% identical, but we have to handle the 10% differences
- We cannot include secrets (e.g. database password and keys) in version control.
- We want to release without downtime.
- We want to release new version fast, with quality control
To be continued.