1. User case
Nowadays, it is common for companies to operate in multi-cloud environments, such as Azure and AWS. They often use Microsoft Entra ID (formerly Azure Active Directory) as their centralized identity provider (IdP), managing identities for both human users and applications. They would like to use the Entra ID identities to access resources in AWS.
Establishing human user identity access across Azure and AWS is straightforward. The IT department can use AWS IAM Identity Center to allow users from Microsoft Entra ID to sign-in to the AWS Management Console with Single Sign-On (SSO) via their browser. This integration simplifies authentication, offering a seamless and secure user experience across both Azure and AWS environments. For more information, you can read this document.
However, the browser-based SSO approach for human users does not apply to applications.
For applications, developers follow security best practices by using cloud-native IAM (Identity and Access Management) mechanisms to manage resource access. In AWS, this mechanism is AWS IAM, while in Azure, it is typically Azure Managed Identity. For example, by leveraging Azure Managed Identity, developers can build applications in Azure without the need to manage secrets or keys.
This approach is known as secretless access to cloud resources.
AWS IAM and Azure Managed Identity work well within their respective platforms, but there are cross-cloud scenarios where a workload in one cloud needs to access resources in another. For instance, an Azure Function might need to save data to both an Azure Storage account and an AWS S3 bucket for cross-cloud backup. The Azure Function uses Managed Identity to access the Azure Storage account. For accessing S3, the developer could create an IAM user and store the IAM user credentials. However, there is a better way to achieve secretless access to both Azure and AWS resources using the same Azure Managed Identity.

2. Solution
In AWS, there are multiple ways to request temporary, limited-privilege credentials by using AWS Security Token Service (AWS STS), such as AssumeRoleWithSAML and AssumeRoleWithWebIdentity.
The post will explain how to use AssumeRoleWithWebIdentity and IAM Web Identity Role to extend the permissions of the same Azure Managed Identity to also access AWS resources.
We will build an Azure Function with a managed identity, either User-Assigned Managed Identity (UAMI) or System-Assigned Managed Identity (SAMI), to read objects from both an Azure Storage account and an AWS S3 bucket. This same managed identity will work in both Azure and AWS, eliminating the need to manage additional secrets such as AWS IAM user credentials.
The source code is published at github https://github.com/linkcd/Secretless-cross-cloud-access

3. Step by step instruction
3.1 Create Azure functions and managed identities
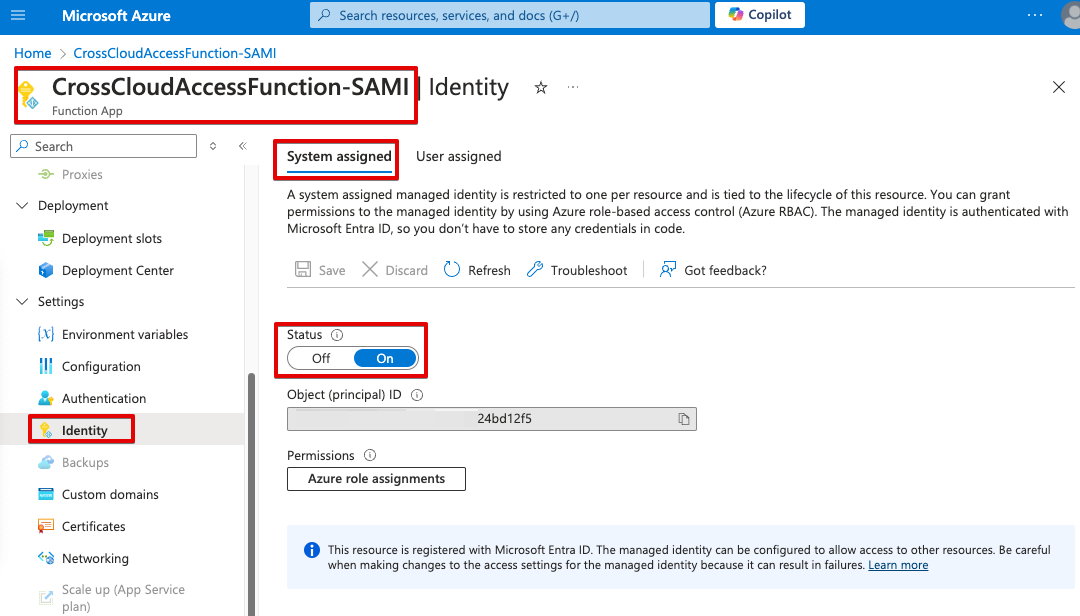
- Create function CrossCloudAccessFunction-SAMI: System-Assigned Managed Identity (SAMI)
- In the management panel, enable SAMI
- Create function CrossCloudAccessFunction-UAMI: User-Assigned Managed Identity (UAMI)
- Create a UAMI named UAMI-CrossCloudAccess-Identity
- Assign the identity UAMI-CrossCloudAccess-Identity to Azure function CrossCloudAccessFunction-UAMI

Note: it is possible to have multiple UAMI or mix between UAMI/SAMI for one Azure function. Depends on which credential (either SAMI, or one of the UAMIs) you use for calling API, you will have different permission to access different resources, depends on what credential you create in the code.
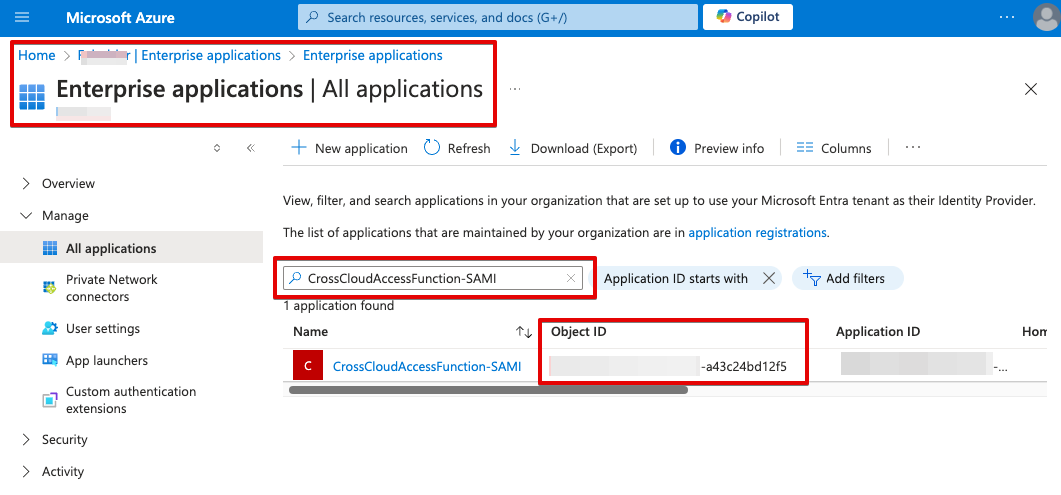
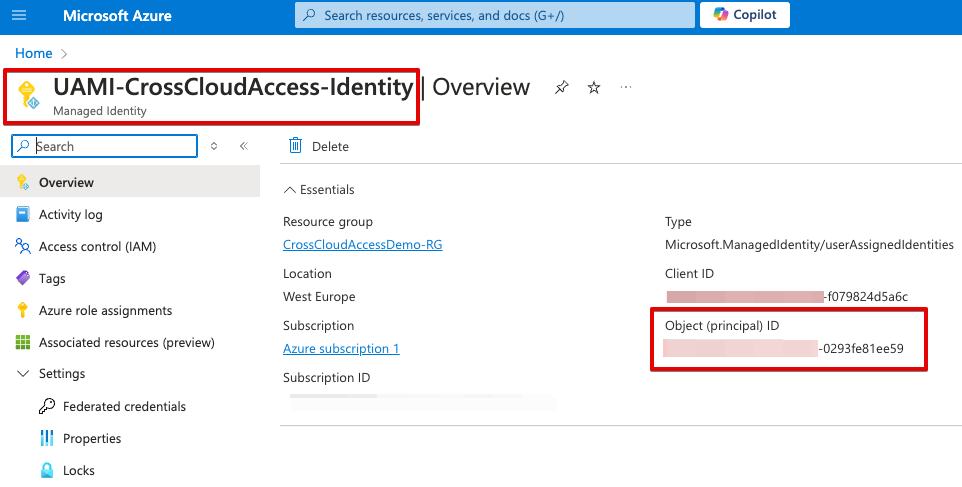
3.2 Look for the Object IDs of SAMI and UAMI
We need to take note of the Object IDs of the SAMI and UAMI. These IDs will be used when assign access to an Azure application role. We also need to take note of the Entra ID tenant ID.
- SAMI Object ID
- Go to Azure Portal -> Entra ID -> Enterprise applications
- Remove the filter “Application type == Enterprise applications”
- Search for the name of Azure Function with SAMI: CrossCloudAccessFunction-SAMI
- Take note of the Object ID. In this case “SAMI-object-id-a43c24bd12f5”
- UAMI Object ID
- Go to Azure Portal -> Managed Identity -> UAMI-CrossCloudAccess-Identity
- You can directly get the client ID of UAMI in its own property page.
- In this case, it is “UAMI-object-id-0293fe81ee59”
- Get Entra ID tenant

3.3 Create Azure application and assign managed identities to its role
- Go to Azure Portal -> Entra Id -> Enterprise applications -> New Application
- Select “Create your own application” and name it as “AWS-Federation-App”
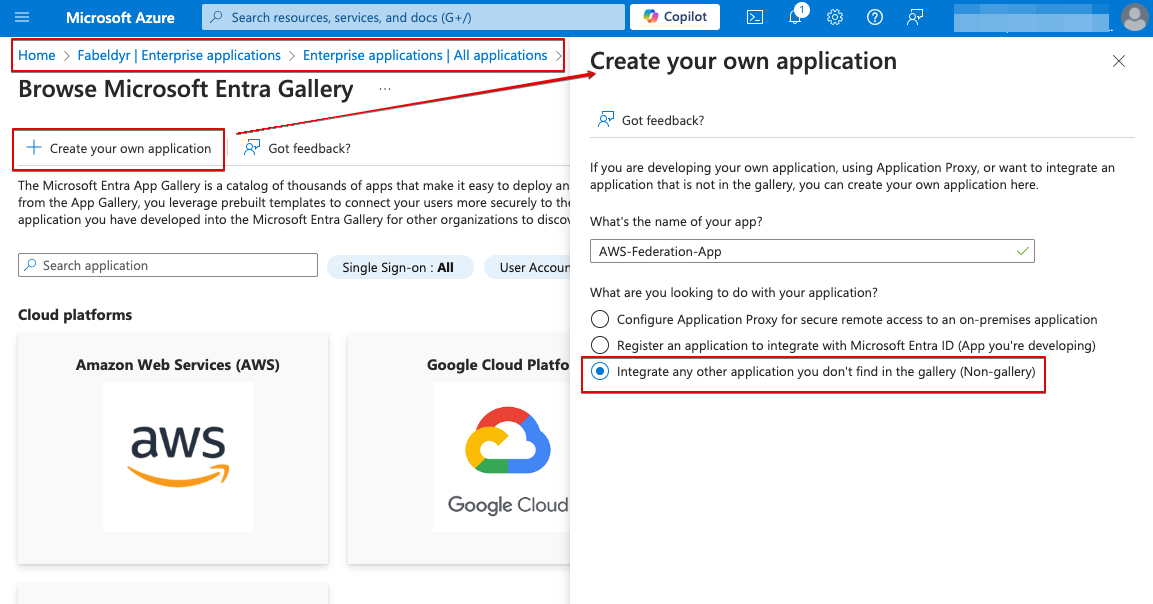
- (Important) Turn on the “User assignment required” to make sure only identities assigned to the application can get a token for the application audience. It means users and other apps or services must first be assigned this application before being able to access it.
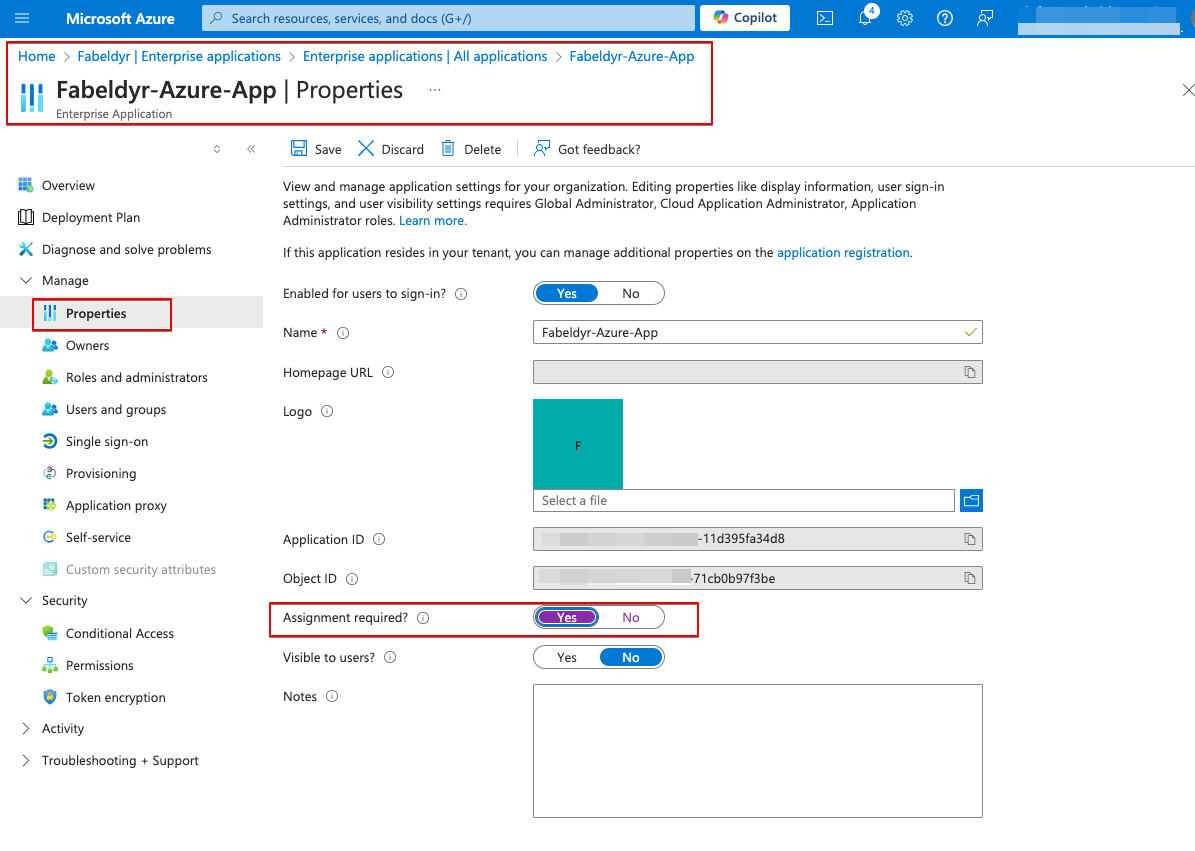
- Create an application role “AssumeAWSRole”

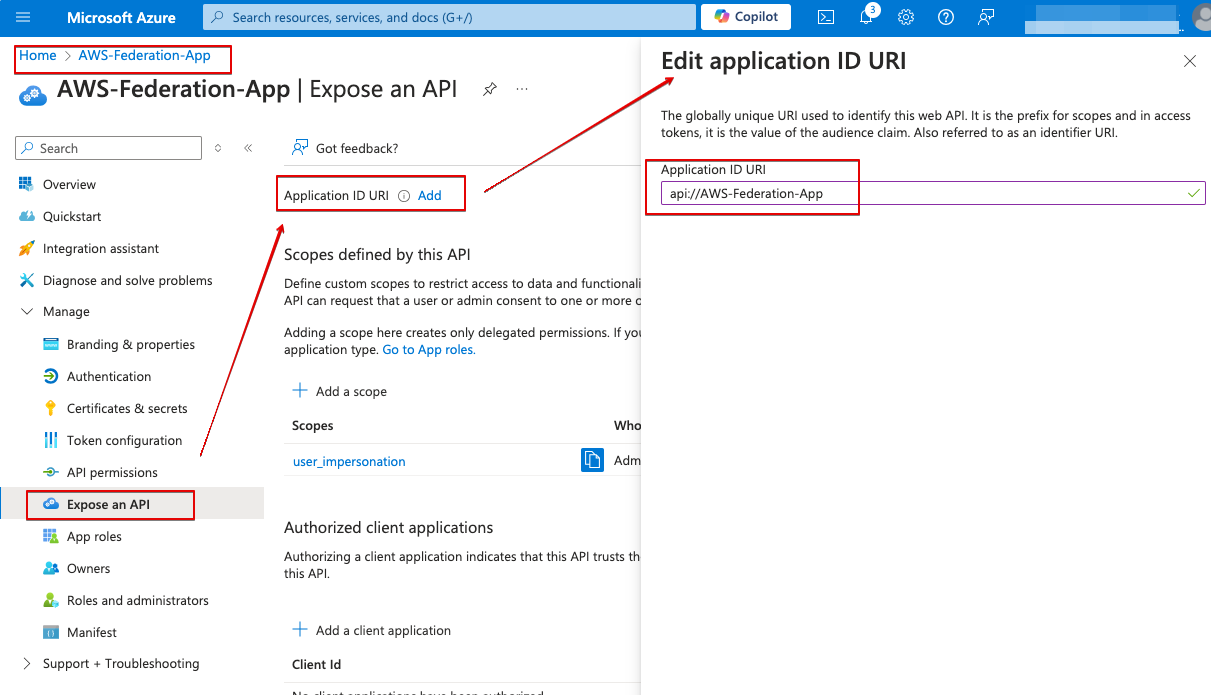
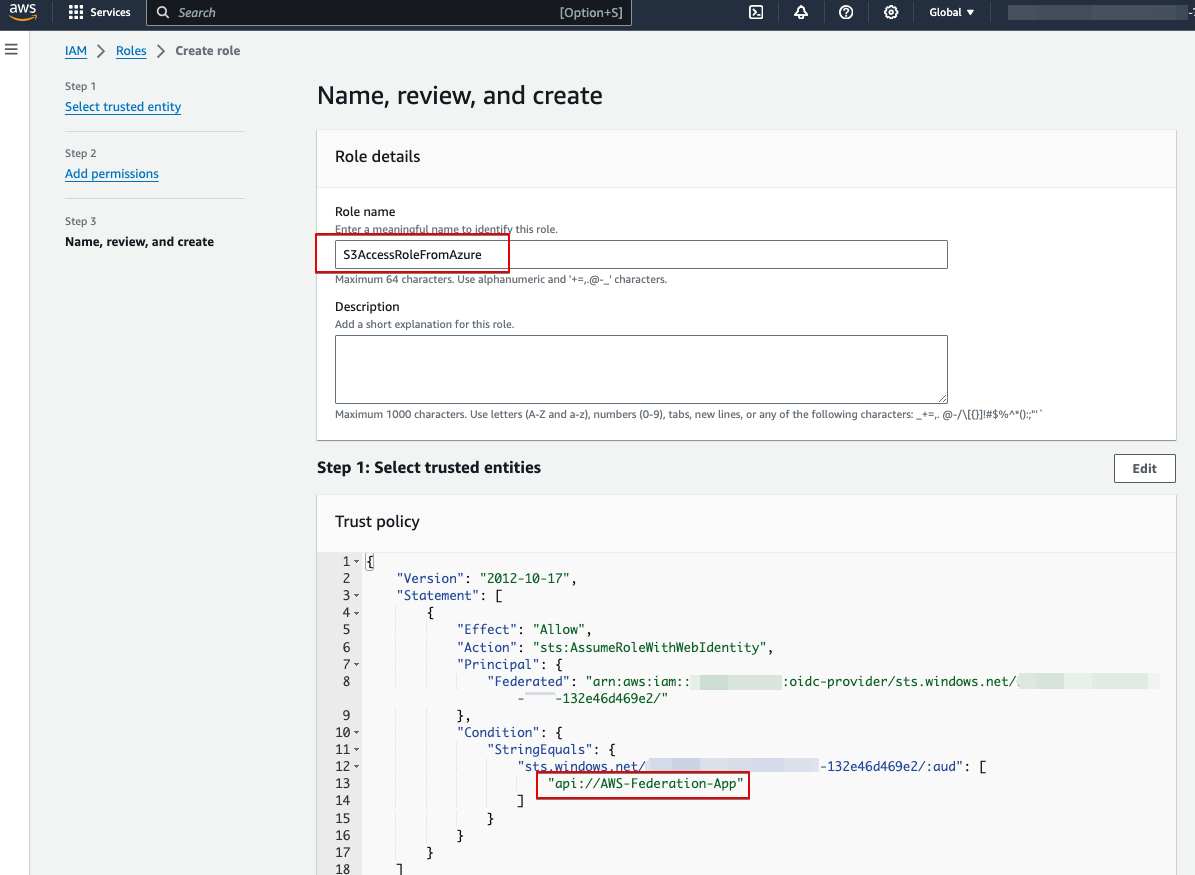
- Add an Application ID URI “api://AWS-Federation-App”
- Finally, assign the managed identities access to the application role
Follow the steps in the document to assign the managed identities access to the application role
1 | # Your tenant ID (in the Azure portal, under Azure Active Directory > Overview). |
- Verify that the UAMI and SAMI are users of the application

3.4 Setup federation between the Azure application role and AWS IAM
- Go to AWS console, then head to IAM
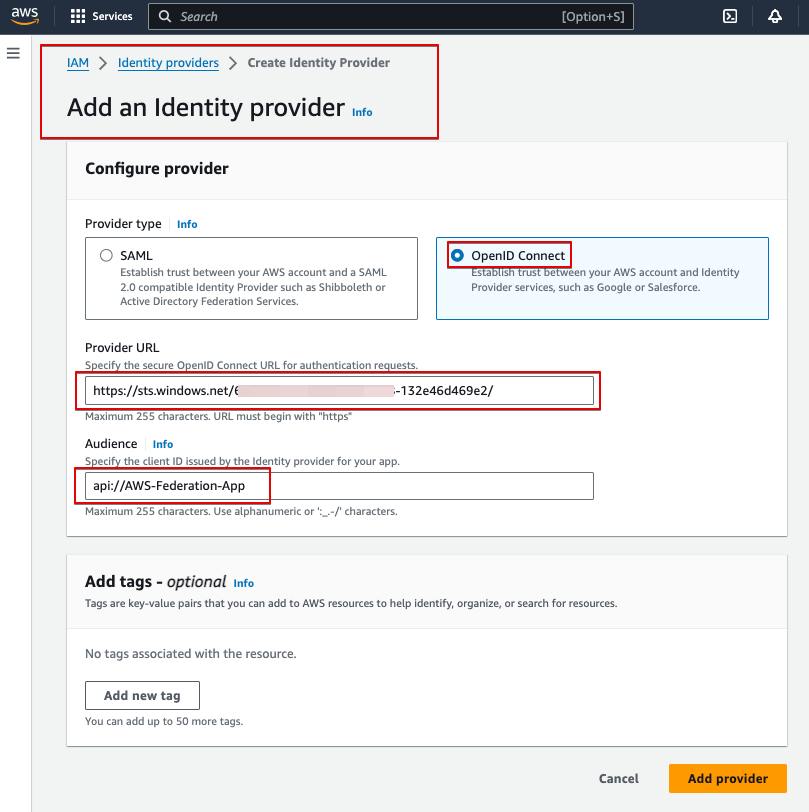
- Click “Identity providers” and add an “OpenID Connect” provider
- Provider URL: https://sts.windows.net/[your-azure-tenant-id]/ (note: make sure you add “/“ at the end of the URL)
- Audience: Application ID URI “api://AWS-Federation-App”
3.5 Create AWS S3 bucket and related AWS IAM Role for accessing S3
- Create an AWS S3 bucket
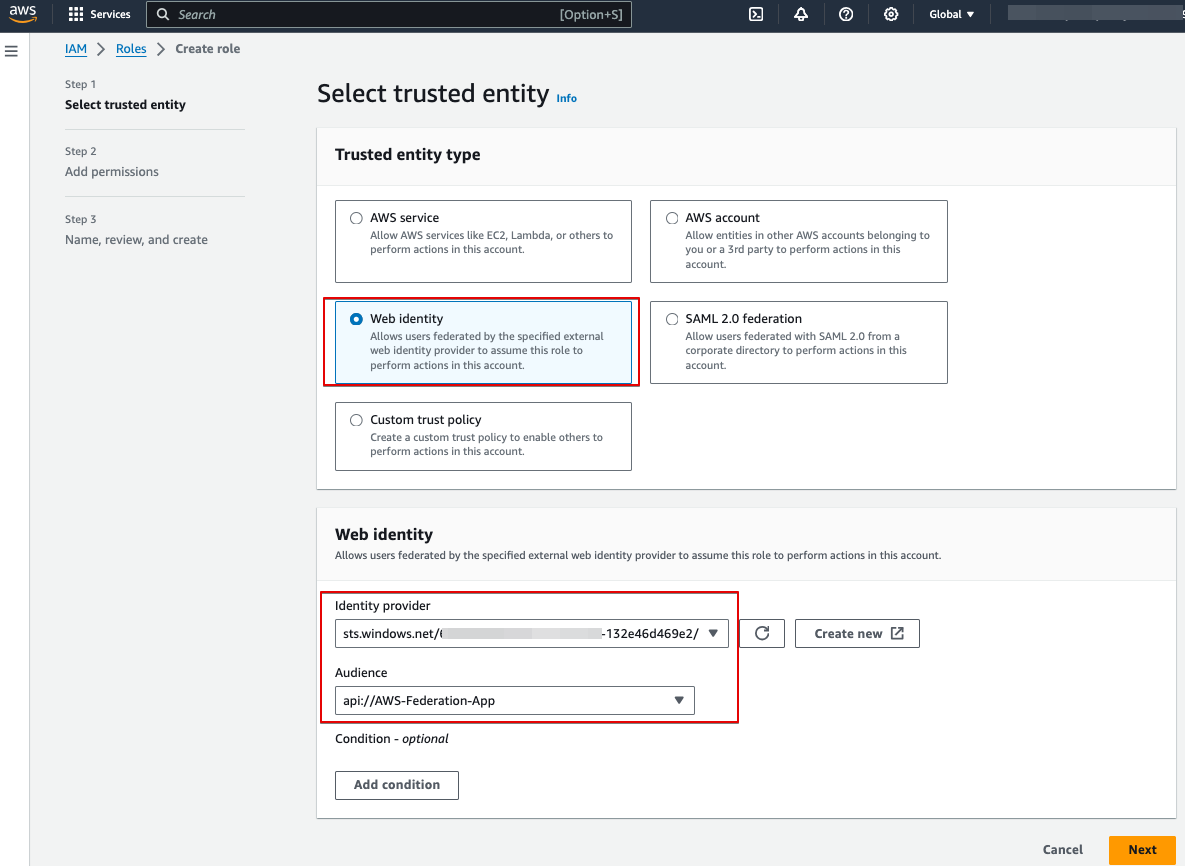
- Go to AWS IAM, create new Role for access S3
- Trusted entity: the OpenID Connect Idp that we just created
- Audience: “api://AWS-Federation-App”
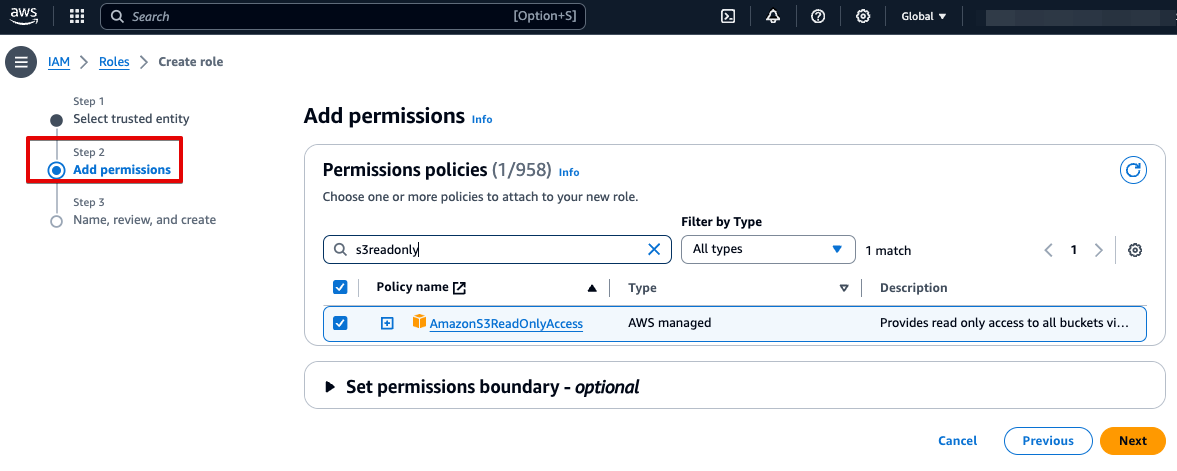
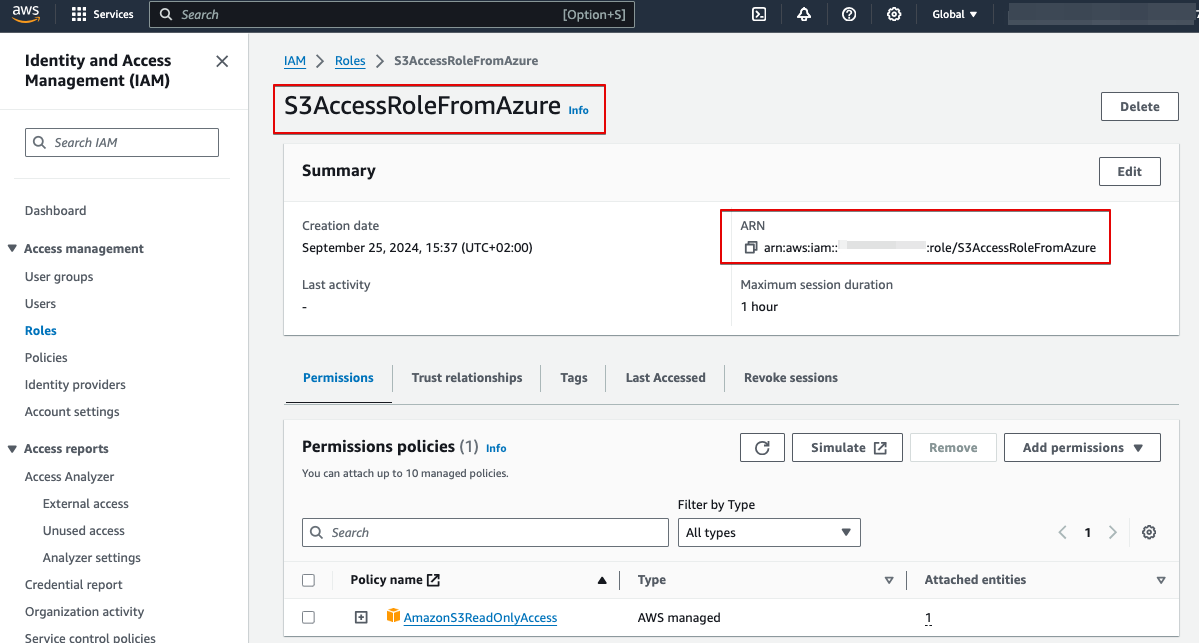
- Assigning the s3 read-only permission (NOTE: It grants the read-only permission to ALL s3 buckets. Do NOT use it in your production workload)
- Name this role as “S3AccessRoleFromAzure“
- Take notes of ARN of these AWS IAM Roles. Azure function need it for assuming the role.
- arn:aws:iam::[YOUR_AWS_ACCOUNT_NUMBER]:role/S3AccessRoleFromAzure
3.6 Create Azure storage account and setup permission for managed identities
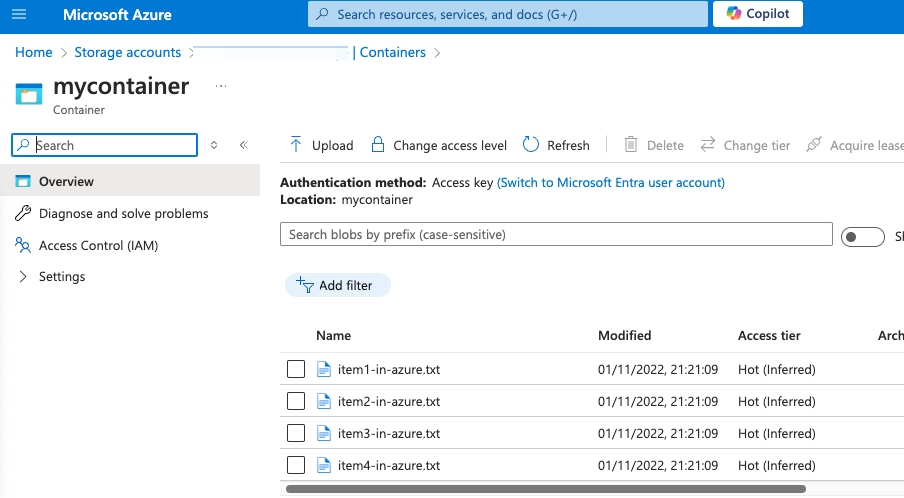
- Create an Azure storage account and upload some test files into a container named mycontainer.
- In the storage account management panel, grant UAMI and SAMI “Storage Blob Data Contributor/Owner” Role
(Note, the simple “Owner” role of storage account top level is NOT enough for read/write blobs in container), see document)
3.7 Update Azure function source code
Now we got everything ready, time to work on the source code of Azure functions.
Both SAMI and UAMI based functions use the same code base, as there are only a difference of getting AzureCredential between SAMI and UAMI. If you know for sure which type of managed identity you are using, you can remove the if/else condition to optimize the code.
In addition to the run.csx, also use function.proj to include AWS SDK for calling AWS APIs.
screenshot of run.csx

screenshot of function.proj

3.8 Test
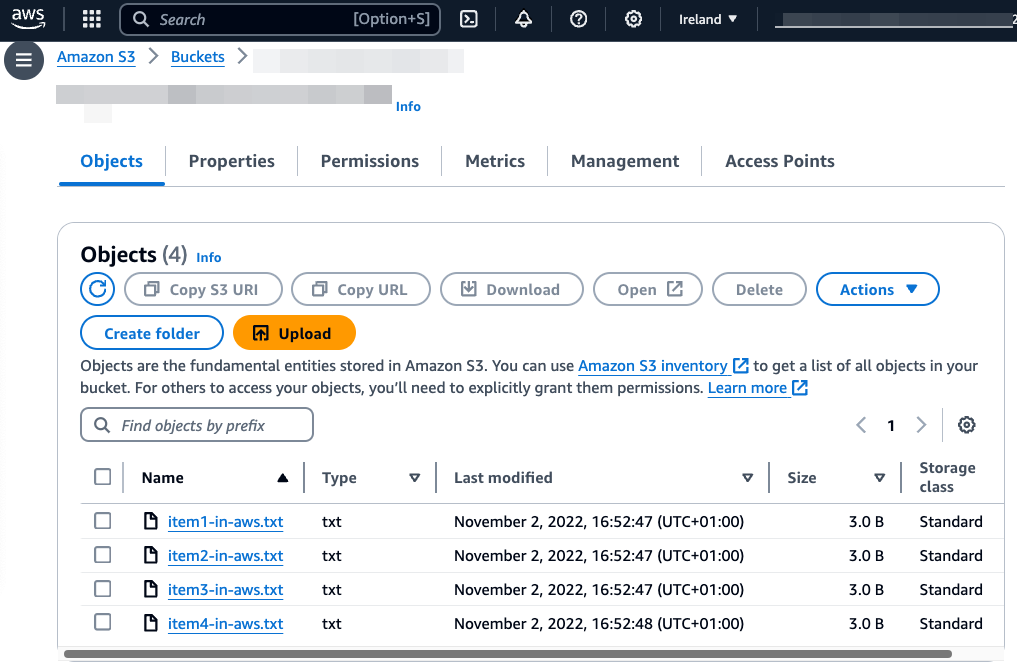
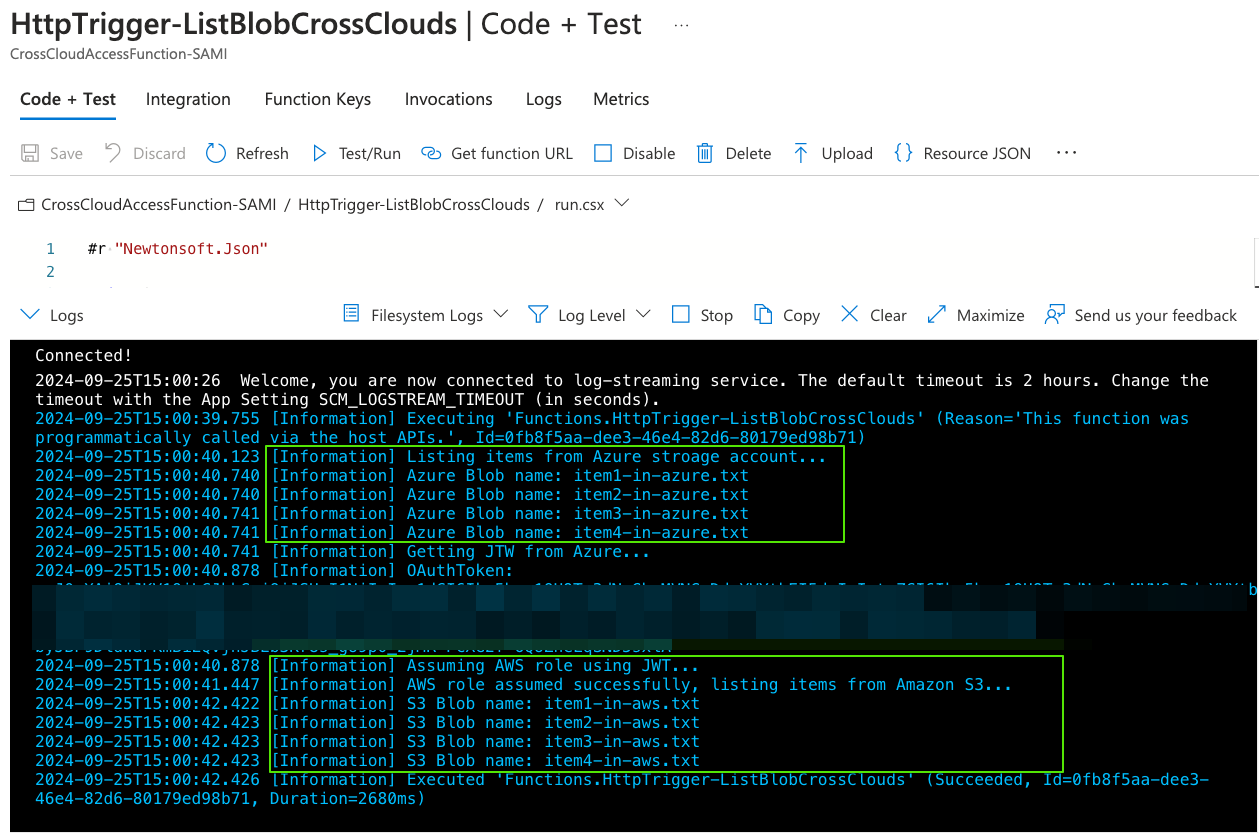
- Now we have files both in Azure storage account and in AWS S3
- Call the Azure Functions
Use the sample input Json for UAMI and SAMI when you are calling the Azure Functions. (Remember to replace the placeholder parameters with correct values.)
The azure function prints the JWT in the log, it looks like
1 | { |
- Successfully load data from both Azure and S3
Conclusion
By following this post, you can continue using Entra ID as a single IdP, covering both AWS and Azure. This approach not only reduces management overhead but also enhances security in a multi-cloud scenario.
Also read:
- Access AWS resources using Azure AD Managed Identity
- Automating OpenID Connect-Based AWS IAM Web Identity Roles with Microsoft Entra ID
Disclaimer
This blog is intended solely for educational purposes and reflects the personal views and opinions of the author. The content provided here is not intended to be, nor should it be construed as, official guidelines or professional advice on security matters. Readers are encouraged to seek professional guidance for specific security concerns. The author assumes no responsibility or liability for any errors or omissions in the content of this blog.